Categories
Graphics/CSS HTML5 JavaScript

Declarative Elements versus JavaScript and CSS

Over time as I looked at several of the new elements in HTML5, I saw a trend: many of the elements are single purpose derivations of popular, and commonly occurring, JavaScript and CSS applications. Consider the following list:

  • the progress element
  • the meter element
  • the hidden attribute
  • the details element
  • the telephone input type
  • the email input type
  • the search input type
  • the color picker
  • various date pickers

As I wrote in one of the change proposals, any one of these would have be welcome ten years ago, when HTML4 was released. But now, after we’ve come so far with using JavaScript and CSS, not to mention SVG and the Canvas element—what is the lesson we’re learning from these additions?

Ten years ago, support for CSS and JavaScript was poor enough that something like a color picker was almost impossible, unless you used Flash. Now, though, there are dozens of good libraries available that can implement a color picker. Drupal’s color picker is based on the jQuery UI, but it’s not the only option.

We’ve also had date pickers for years, too. Date pickers in all shapes and sizes, and most configurable by the user so they can get the absolute best date picking experience. The same can be said for progress bars, and if meter is supposed to represent a gauge, there are libraries that provide gauges, too.

As for the input types, such as telephone and email, most of the validation for these types of values can be handled with one line a code and a regular expression. The types also beg the question: where does it end? If we need single purpose data types such as telephone and email, why stop there? What about social security number for people in the states, or zip and/or postal codes?

One of the primary reasons for regular expressions in JavaScript is to ensure that a given string fits a given format. If we don’t know how to use regular expressions, that’s OK, because just like the iPhone, there’s a app for that. There are many libraries that automate the format validation for us. All we have to is assign a class to the relevant input fields.

The new elements, attribute, and input types aren’t just treading in JavaScript and CSS territory. Supposedly the reason for the hidden attribute is accessibility, as is a reason for several of the other elements. Yet the WAI-ARIA effort has provided the exact same functionality and semantics that can be used and reused with any number of elements.

ARIA is to accessibility, as JavaScript is to behavior, as CSS is to style, as RDFa/Microformats/Microdata are to semantics, and as HTML is to structure. Except, suddenly, HTML is no longer about structure. The clean separation between the various domains that has worked so well in the past is seemingly no longer of interest to the HTML WG. Consider the following statement in the HTML5 specification:

Authors are encouraged to use declarative alternatives to scripting where possible, as declarative mechanisms are often more maintainable, and many users disable scripting.

For example, instead of using script to show or hide a section to show more details, the details element could be used.

Why?

The arguments I’ve read are that declarative alternatives can be used by non-developers, but they’re no easier for non-developers to use than most of the JavaScript libraries I know, which usually only require adding a class to an element.

I’ve also read that declarative alternatives aren’t impacted when JavaScript is turned off, but in my opinion, that’s not a good thing. People have become used to JavaScript-based functionality on the web. They know if a section is exposed via JavaScript that turning off the JavaScript should display the section by default. People can control JavaScript and Flash in their browsers, which means they can control the behavior of the web page. They can also turn off CSS, if they wish. But they have no control over declarative elements and animations.

Consider, too, the costs involved with all these new elements and other objects. Rather than browser developers focused on making the most efficient JavaScript engine, the most secure browser, adding support for SVG and Canvas, Video, WebGL, and any of the other new technologies, the developers now have to focus on what is nothing more than a duplication of functionality already available via libraries, apps, and widgets. Which they also have to support through the core technologies of CSS and JavaScript.

Then consider all of the HTML editors and WYSIWYG tools that now have to add several new input types and elements, including having to provide a live preview of the functionality. Implementing all these new elements, attributes, and input types must seem a daunting task.

How about the web authors and designers? New toys, eh?

New toys that lack both the sophistication and customization capability that we’ve had with our existing libraries. New toys that aren’t accessible until we can convince the screen readers that no, seriously, not only do they have to support ARIA, they have to support all these other new things, too.

Categories
Graphics/CSS

Incorporating CSS3

With the growing support for CSS3 in most of the major browsers, including Firefox, Safari, Opera, and now Chrome, I decided to incorporate the use of CSS3 properties into my own site designs. In addition, I also used an SVG graphic whenever I wanted a background that sized with the page.

The CSS3 properties I’m most interested in are text-shadowbox-shadowborder-radiusborder-image, in addition to support for RGBA opacity. No more having to use kluge methods to add curved corners, or shadow text; no more stretched transparent PNGs, or layered DIV elements in order to provide border images. Though not all browsers support all of the properties, as long as we use the effects carefully, the designs should degrade, nicely.

text-shadow

The text-shadow attribute is from the CSS3 Text Module, which is currently in candidate recommendation. It’s implemented as follows:

h2 { text-shadow: #ccc 1px 1px 2px }

The first parameter is the color specification used for the shadow, the second and third are the shadow offsets (horizontal distance to the right, vertical distance to the bottom), and finally the radius of the blur. The setting just described is quite subtle, and the shadow effect not immediately apparent when looking at my sites. I use the above CSS setting to add a level of richness to the header text in my sites, rather than create a noticeable text shadow.

I use more distinctive text-shadow settings for my site titles, including another subtle effect for the Secret of Signals web site. Though it may not be apparent, there is a text-shadow applied to the header, but the offsets are set to zero, which creates a “glow” around the text—white for inactive, red for when the header link is active—rather than a distinctive title.

#header h1.site-name a {
  color: #fff;
  text-decoration: none;
  text-shadow: #fff 0 0 6px;
}

#header h1.site-name a:hover {
  text-shadow: #f00 0 0 6px;
  color: #f00;
  text-decoration: none;
}

The text-shadow works with Safari 3.1, Opera 9.6 and up, and the beta of Firefox 3.1. Neither Chrome nor IE8 currently support text-shadow.

box-shadow

The box-shadow CSS3 property is part of the backgrounds and borders module, which is currently only in draft status. Since this module and the properties it describes are a work in progress, we need to apply the new effects, like box-shadow, using each company’s CSS extension naming procedure:

  • -moz-box-shadow for Mozilla/Firefox 3.1
  • -webkit-box-shadow for Webkit/Safari 3.0 and up and Chrome

The syntax for box-shadow is:

  -moz-box-shadow: 1px 1px 10px #00f;
  -webkit-box-shadow: 1px 1px 10px #00f;
  box-shadow: 1px 1px 10px #00f;

In addition to the extension listings, I also include the final box-shadow property, so that I don’t have to modify my CSS style sheet when the module reaches candidate recommendation status.

The first two parameters are the shadow offset, just like with text-shadow. The third is the radius of the shadow blur, and the fourth the color of the shadow. This setting is what I use for the blue menu bar in the top, right corner of Secret of Signals in addition to the shadow effect I use around the sidebar and content area in this space. Again, as with the text-shadow effect described earlier, using a small offset and a large blur radius creates a “glow” around the box, rather than a sharply defined shadow. The larger the blur radius value, the more diffuse the shadow effect.

In this site, I’m using the box shadow to “soften” the hard edges of the sidebar and content columns, as well as enhance the “candle effect” of my incorporated Burningbird symbol. In Secret of Signals, I’m trying to emulate the glowing blue buttons we see on our USB devices. In MissouriGreen, I use a more traditional shadow effect around the top menu items.

Currently box-shadow is not supported by IE or Opera. The box-shadow does work with Chrome, but when combined with the next CSS3 property I’m covering, border-radius, the effect is less than optimal.

border-radius

The border-radius property is also a part of the CSS Backgrounds and Borders module currently in work at the W3C, and as such, each browser that supports it, does so with its own extension naming. To me, the border-radius property is important because with it, we can finally begin to simplify our web sites, eliminating all of the nested div elements we’ve used in order to create the effect of rounded corners.

The following is an example of the syntax used with border-radius:

  -webkit-border-radius: 30px;
  -moz-border-radius: 30px;
  border-radius: 30px;

The parameter represents the “radii of a quarter ellipse that defines the shape of the corner of the outer border edge”, according to the specification documentation, and is a shorthand technique for the longer specification of each corner:

border-top-left-radius:     30px;
border-top-right-radius:    30px;
border-bottom-right-radius: 30px;
border-bottom-left-radius:  30px;

Currently, I am using a border-radius for the columns and menu list in Secret of Signals, and the columns in this space. However, the corner curvature does not show for the menu items in Safari and Chrome, as neither browser currently implements border-radius for list (li) elements. However, both Safari 3.x and Chrome, in addition to Firefox 3.x and up, do support the border-radius on the div elements acting as columns.

One caveat when it comes to using border-radius with box-shadow together: Chrome does not map the edge of the box shadow to the curved border, leaving a rather disfiguring “black” filling in the gap between. Of all the browsers and effects, this is the only instance where an applied effect does not degrade well.

border-image

The last CSS3 property I have incorporated into my sites, at least for now, is the use of border-image at MissouriGreen. This is a wonderful CSS property that is a little tricky to implement, but well worth the effort. As with border-radius and box-shadow, it is part of the CSS Backgrounds and Borders module.

I created a single image to use in my MG borders.

[image gone]

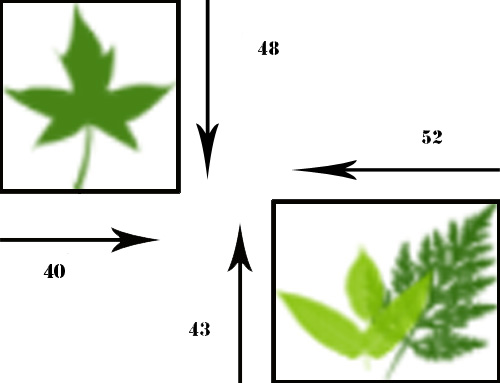
I wanted this image to serve as border or my individual posts, except that I wanted the top leaf to be at the top, left border, the bottom two leaves to form my bottom, right border, and I wanted the tips of the leaves to “stretch” to form an enclosure for the text block.

The CSS specification I use is:

  -moz-border-image: url('leaves.png') 48 52 43 40 stretch stretch;
  -webkit-border-image: url('leaves.png') 48 52 43 40 stretch stretch;
  border-image: url('leaves.png') 48 52 43 40 stretch stretch;

The parameters for the property are the URI for the image, four values that determine, respectively, the height of the top edge for both top corners, the width of the right edge, for both right corners, the height of the bottom edge, and the width of the left edge. The final two parameters instructs the browser how to scale or tile the border image.

In MissouriGreen, the upper leaf in the border image is 50 pixels tall and 45 pixels wide; the two lower leaves are 55 pixels wide, about 45 pixels tall. When I specify 48 pixels for the upper corners, the part of the image that would be used for the upper right corner is transparent pixels, and so no image shows. However, the part of the image used for the upper left is the solitary leaf, but the amount I specify feels just above the end of the stem.

The width I give for both right corners again uses only transparent pixels for the upper right corner, but the two leaves are used for the bottom right. Again, though, the width I specify falls just to the right of the end of the leftmost leaf.

The bottom edge falls just short of the top of the rightmost leaf in the double pair. For the left width, the amount given places the edge just before the tip of the solitary leaf’s right border.
MissouriGreen border image

How the border image fills the space given around the nodes is based on where I set the edges in the previous four values (notice all were just before the leaves’ terminating edges), and the next two parameters, in my example both given as stretch. The first parameter determines what happens to the image’s top, middle, and bottom border, while the second parameter controls the left and right borders. The allowable values are “stretch”, which means to stretch the image, and “round”, which will tile the image, rounding it in such a way that it fits within the given space.

By using stretch, what I’ve done is instruct the browsers to take the leaf tips and stretch them out, along the sides, top, and bottom. Since the image is stretched, and the dimensions I provided show leaf tips ending in transparency, the ends stretch, more or less, evenly along the sides, top, and bottom, creating an open enclosure around the text.

Other uses of the border-image property can specify a different border image for each border, as well as an image with graphics that would scale and tile nicely to fully enclose the space—the W3C Borders and Background module includes a nice example.

RGBA

The support for RGBA comes with the CSS Color Module Level 3, which is in draft state. Most browsers support an RGB color space, but only Firefox, Safari, Chrome, and now Opera 10 beta, support RGBA.

Why RGBA is important is that it gives us the ability to define the opacity for an element, without having to use the opacity property, which not only impacts on the element, itself, but also the contents of the element. With RGBA, I can set both the color and alpha transparency of an element (the -A part), and not impact on the opacity of the contained elements.

#sidebar-wrapper { background-color: rgba(255,255,255,.80); }

The first three parameters are the Red-Green-Blue values for the color (in this case, white), and the fourth is the alpha transparency value, in this case an 80% opacity value. I use this value for my sidebar at this site, and other variations for the content, and the footer. As you can see, setting the alpha transparency of the background for these page content areas does not impact on the opacity of their contents.

Opera 9.x doesn’t support RGBA, but you can specify an RGB setting, first, and the browser will pick that up and use it.

This is one where IE does not degrade gracefully. If you specify an RGBA value, IE doesn’t understand it but rather than use the previously defined RGB setting, it falls back on its default. However, there is a simple trick to get around the problem. IE also doesn’t support certain of the advanced selector syntax, while other browsers do. A simple, cross-browser solution for using RGBA is the following:

#footer { background-color: #fff; }
html>body #footer { background-color: rgba(255,255,255,0.8); }

Degrading Gracefully

None of these effects currently work with IE8, the box-shadow, border-radius, and border-image don’t work with Opera, and text-shadow doesn’t work with Chrome, but the sites look fine without any of these effects. The only problem I’ve experienced is with Chrome and mixing border-radius and box-shadow, and I’ve left the effects, as a reminder to Google that it’s better not to implement support for specific CSS properties, rather than do a half-assed job of it.

Though not specific to CSS3, I also used SVG as background for this site and Secret of Signals: a wavy background in reds to represent the ‘signal’ in Secret of signals; and a white on blue curvy effect in this site to represent smoke, and to complement the “soft corner” effect I was creating. Both are deliberately sized just to the original browser window, not the entire contents, as the latter stretches the patterns too much. However, resizing the browser window will re-size the pattern. Opera, Firefox, Safari, and Chrome all pick up the SVG, IE does not.

For more on CSS3, I recommend CSS3.info.

Categories
Graphics/CSS

Aviary gots business model

I’ve written about Aviary, the online graphics toolset that includes Phoenix, a graphics tool/photo editor, Peacock, a “visual laboratory” (background editor), Toucan, for creating color swatches, and supposedly Raven, for vector editing. I’ve been waiting for Raven, and it is out in alpha, but available only for Blue subscribers. Blue subscribers?

Yes, Aviary now has subscription plans, Blue and Green, each of which provides a different level of support. Blue provides everything, including access to early release software, such as Raven. Blue is also priced at $149.90 a year, though Photojojo readers can get the Blue for $95. At least the first 2000 readers can—the offer is limited.

It will be interesting to see how the Aviary toolset does as a subscription model. Internet users balk at anything that isn’t free, with mumbled, vague assumptions of “ad-based” as an alternative to paid subscriptions. I think the Aviary pricing model is fair, not necessarily great, but workable. The Blue plan is priced high for internet usage, but is much cheaper than Photoshop. Not as cheap as GIMP, though. However, when you consider the plan covers all the Aviary tools, including ones to be released in the future, the deal does seem sweeter. The toolset is also available from all your computers.

Will I be getting a subscription? No, I’m into frugal right now. Very, very frugal. I will miss being able to try out Raven, but I’m content with Inkscape for vector editing. However, for those of you interested in the Aviary toolset and with some bucks to spare, you might check to see if you can get the Photojojo pricing and save $55 bucks.

Categories
Graphics/CSS Photography

Gimp 2.6 alive and well on the Mac

GIMP 2.6 is now available on the Mac OS X, in addition to both Windows and Linux. On the Mac, you can install it via Macports, or you can use a pre-built version of the application, available for both Tiger and Leopard. I have the Macports version on my Leopard machine, the pre-built on my Tiger laptop.

First impressions of the newest version is that I like the improvements to the user interface. The original application (Toolbox) toolbar has now been merged as part of the image window, simplifying the interface. The application is still a MDI, or Multiple Document Interface, but it’s simple to keep all of the tool’s components visible.

The necessary photo enhancement tools are all present and accounted for, including Layers, Curves, and the all important Gaussian blur, as well as several of the other handy enhancing tools. The application still interfaces with UFRaw, the separately accessible open source tool that provides RAW image pre-processing.

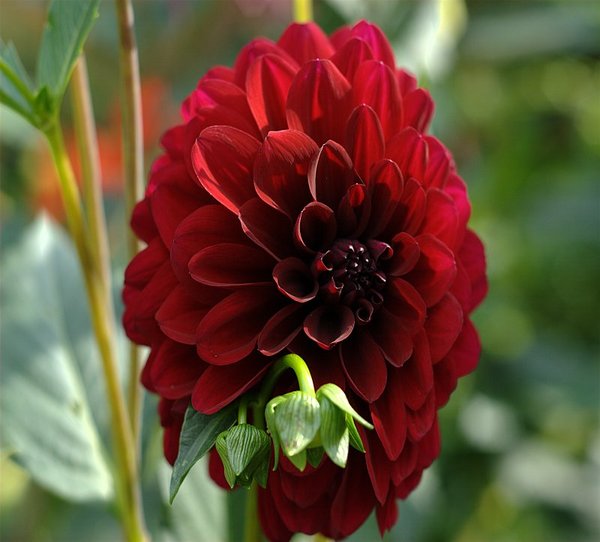
One of the new additions to Adobe’s Photoshop CS4, I gather, is the addition of seam carving whereby the tool can determine where pixels can be compressed and still maintain most of the image’s integral look. GIMP 2.6 also incorporates a plug-in known as Liquid Rescale that is based on the same algorithm. I didn’t have a photo with a long, unending beach, but I did have a photo of a bright red mumdahlia. Following are two versions of the photo, a before and after scaling with Liquid Rescale.

Red Mum before

Red Mum after

The red flower is distorted, which isn’t surprising. However, the bud, leaves, and even some of the background are relatively untouched. Interesting effect. The plug-in’s web site has examples that show how to use Liquid Rescaling to enhance photos without obvious distortions.

Another major change with GIMP 2.6 is the addition of the GEGL (Generic Graphics Library). From the GIMP 2.6 release notes:

Important progress towards high bit-depth and non-destructive editing in GIMP has been made. Most color operations in GIMP are now ported to the powerful graph based image processing framework GEGL, meaning that the interal processing is being done in 32bit floating point linear light RGBA. By default the legacy 8bit code paths are still used, but a curious user can turn on the use of GEGL for the color operations with Colors / Use GEGL.

There’s also a GEGL tool, which provides access to several operations, though I’d use caution when applying any of the operations to a large, RAW image. Among the more familiar of the operations is an unsharp-mask; among some of the more interesting is the whitebalance operation, demonstrated in the following snapshot.

The new modifications for GIMP 2.6 go beyond making our photos prettier. The new Brush Dynamics feature is a kick to play with, and one can see how it would be useful when creating specialized effects. With the Dynamics, I can create a wonderfully fun fairy sparkle effect, just by setting the pressure, velocity, and random settings for the brush opacity, hardness, size, and color.

Some of the more popular plug-ins, such as the Layers plug-in, which emulates the Photoshop layer effects capability still have not been ported to 2.6. Most of the effects, however, can be created by scratch until the plug-ins are updated. Plus, there’s enough to the basic tool, including the new GEGL operations, and the Brush Dynamics to keep one occupied for hours.

GIMP isn’t the tool for everyone. If you’re proficient with Adobe Photoshop, work in an operating system in which Photoshop is released, and can afford the rather expensive upgrades, you should stay with Photoshop. However, with today’s troubled economic times, and an increased interest in being frugal, you can’t beat GIMP 2.6’s price: donate what you can to the project. In addition, the new Photoshop CS won’t run on many older Mac architectures, including both my Leopard and Tiger laptops.

Paired with UFRaw, you have what you need to do sophisticated photo processing with GIMP. And with all of the graphics plug-ins, filters, scripts, and so on, you can do most other graphics work with the tool, as I hope to demonstrate more fully in the future.

Categories
Graphics/CSS

Gimp 2.6 released

GIMP 2.6 was released this week, with enhanced UI experience, as well as support for 32-bit color. The latter is particularly important as several web designers and photographers have focused on GIMP’s 8-bit support as their main reason not to use the tool. The 8-bit support is still the default, but you can turn 32-bit on, and the next few versions of GIMP should incorporate comprehensive support for both 32-bit and non-destructive editing.

The release is source code only at the GIMP site, though Lifehacker provides links and instructions for installing the tool in Ubuntu and Windows. The application has not been ported to Macports yet, and probably won’t be for some time. I am considering doing a source code build, something I normally wouldn’t touch. However, I really do want to see the new features, and in particular, the 32-bit support.

What makes the timing on GIMP 2.6 especially relevant is the fact that the days when we could spend thousands of dollars on software and equipment in order to work with our photos and web designs are over for most of us. I wasn’t joking when I said earlier that Frugal is sexy. Not buying is the new black.

When I have GIMP 2.6 installed, I’ll be back with a more detailed look. In the meantime, let’s hear it for 32-bit support. Let’s hear it for free.